- Doc
- TF-SS-MTR-A-04
- Rev
- A
- Issued
Product specification sheet · Quick install
N20 Gearmotor and Clutch
N20, 298:1, custom M4 shaft to drawing TF-D-MTR-01 — with the friction clutch that threads onto it
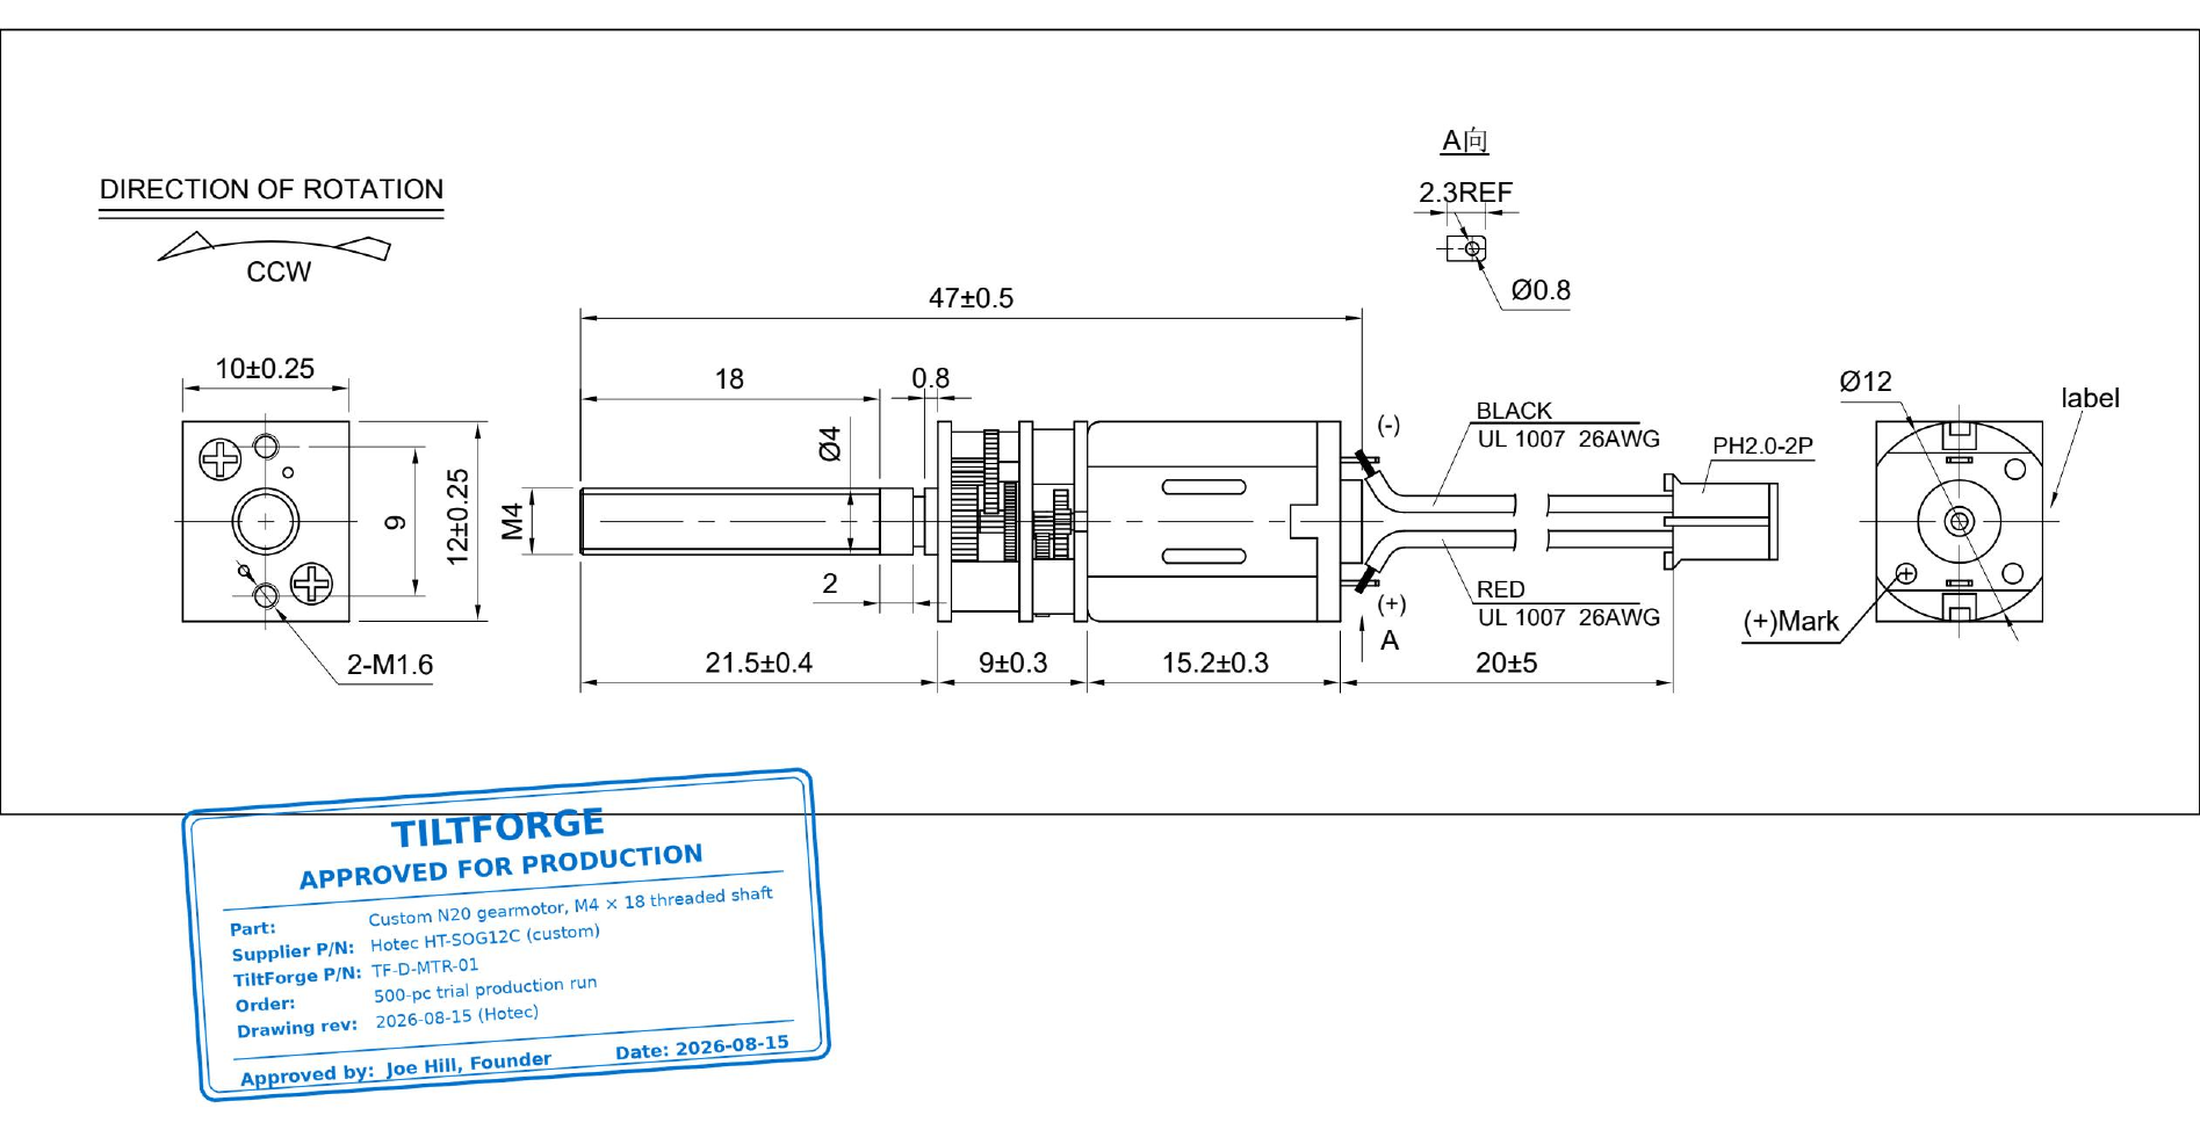
A custom N20 built to a TiltForge drawing: the shaft is threaded M4 so the friction clutch screws directly onto it, which is what let the drivetrain lose an entire axle. The replacement ships in one bag with the clutch hardware that mounts on that shaft.
| Winding | 6 V, 298:1 — 30 RPM rated, 50 RPM no-load |
|---|---|
| Stall torque | 4.2 kg·cm |
| Stall current | < 0.66 A |
| Shaft | M4 × 0.7, 18 mm thread; 2.0 mm plain Ø4.0 at the root |
| Envelope | 47 ±0.5 mm overall; 21.5 ±0.4 mm exposed shaft |
| Lead | UL1007 26 AWG, 20 ±5 mm, JST PH2.0 — red +, black − |
| Rotation | CCW |
| In the bag | 2 fiber clutch washers, 6 K8×3 spring washers, 2 flat washers, 3 M4 nuts (inner, outer, jam) |
| Clutch stack, gearbox out | M4 nut · 3 K8×3 springs, alternating · flat · fiber · printed gear · fiber · flat · 3 K8×3 springs, alternating · M4 nut · jam nut |
Features
- Threaded output shaft. The clutch threads straight onto the motor, so the drive is the motor plus one fixed axle — nothing in between to wear or misalign.
- The nut is the shoulder. The inner nut runs home against the thread runout shoulder and is tightened hard; the clutch clamps between it and the outer nut, which a jam nut locks. Clamp load stays between the nuts.
- Gearbox sees no axial load. Because the clamp is self-contained, tightening the clutch puts no net thrust into the gearbox bearings.
- Current capped by physics. The clutch slips below motor stall, so a jammed blind can never pull stall current. Overload protection with no firmware in it.
- Direct-plug lead. A PH2.0 harness comes on the motor. No stripping, no soldering, no polarity guessing.
- A nineteen-dollar wear part. The motor is meant to be replaceable. When one finally gives up, it is a drop-in, not a new unit — and the clutch hardware comes in the same bag, so the whole stack goes back together fresh.
- The designed failure point. The fiber washers are chosen to wear before the gears, the motor, or the blind do. That is the point.
- Sprung, not just squeezed. Three K8×3 spring washers on each side, alternating in series, keep the clamp load up as the fiber washers wear in, so the slip point holds between refreshes.
- Set by count, not by feel. Run the inner nut home and tighten it hard. Spin the outer nut down by hand until it stops, give it one full turn (six flats) with a 7 mm socket, then lock it with the jam nut.
How to use it
You hold this bag when you build a kit, when the old motor gives up, or when the clutch slips early and its fiber washers have worn. The clutch is specific to this motor: it threads onto the motor's own shaft, so the two ship and sell as one bag. The motor drops into its pocket in shell A and the lead plugs into the board. Every step, in order: tiltforge.com/build.
- Slide in the motorSlide the motor in from the reel side until its shaft comes out the back beside the axle spur.
- Thread on the clutchOn the shaft at the back, stack pieces 1 to 11 in order, Bellevilles alternating. Thin nut 10 snug plus one turn, then lock it with thin nut 11.
- Calibrate onceHold the button 5 seconds, then let go. It finds both ends by itself.
© 2026 TiltForge. All rights reserved. TiltForge and the TiltForge gear mark are trademarks of TiltForge. Specifications are subject to change without notice — this sheet documents Rev A, and the current revision is always at https://www.tiltforge.com/p/motor.